Electrics
Battery Sizing
As part of a spreadsheet to calculate the power requirements in the camper van, I add an area to help size the battery and solar panel.
I had already calculated that I would consume about 878 watts per day and that I would need about 146 Ah of battery.
Always remember that batteries have a life span and that the charge will deteriorate over time so allow a little extra now as in 3 years your battery may be only 90% of the stated capacity.
As I was using AGM batteries then the rule of thumb is to only discharge to about 50% of capacity. This means you need double the battery capacity than what you have just calculated. So, I need a minimum of 292 Ah of battery power. Batteries come in fairly standard power ratings, 110, 130 , 160 etc. So, I chose 160 Ah batteries to give a total of 320 Ah.
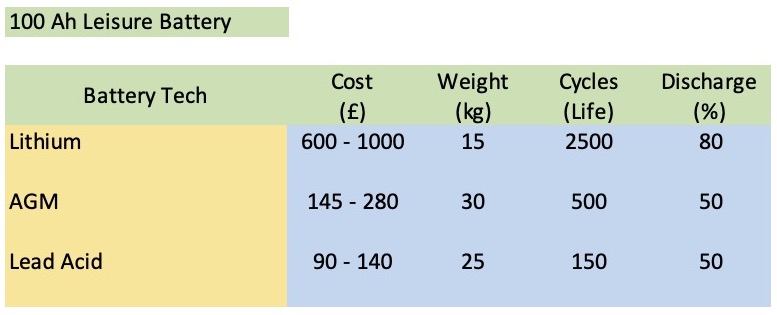
Batteries come in various shapes, sizes and technology. These determine the cost of the battery. I have a chart which shows the rough cost, weight, life and recommended discharge of 3 types of battery. This came from the Alpha Batteries website. I chose a 100 Ah Leisure battery as a baseline. There is a huge cost difference between £90 and £1000 per battery but you should consider life and discharge to make a true comparison.
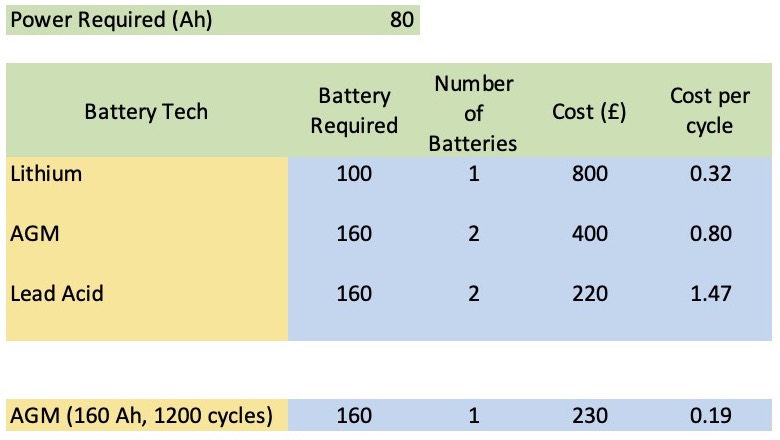
With an 80 Ah requirement and discharge % you can calculate the battery requirement and then the number of batteries you need. Here 1 x 100 Ah is enough for lithium but you need 2x 100 Ah for AGM and lead acid. The cost and cycles are used to workout which is most cost effective in the long-run. Lithium comes out at £0.32/cycle compared to a cheaper lead acid at £1.47/cycle.
However, it is not that simple. You should look at the cost between single larger batteries and 2-3 smaller batteries as you can get a single 160 Ah battery for not much more money and a better life, that makes it a better investment than the Lithium!
So, there is a huge choice of spending lots upfront, capacity, weight, life and how you use the battery. Some lithium batteries must not be charged below 0 ˚C. Knowing lots helps so check out Mobile Solar Power and the YouTube videos by Will for loads on batteries.
12V Electrics Basics
All the low voltage systems in the van will be using 12V d.c. (this excludes the Solar panel system which will be dealt with later).
With d.c. there are a few essential equations to learn.
1 - V=IR Voltage = Current x Resistance
2 - P=VI Power = Voltage x Current
3 - E=PT Energy = Power x Time
From 2 and 3 E=PT or VIT , so = Voltage x Amperes x Time
Voltage is measured in Volts (V)
Current is measured in Amperes or Amps (A)
Resistance in Ohms (Ω)
Power in Watts (W)
Energy in Joules (J) or Watt-hours (Wh)
It is common in 12V systems that Energy (Electrical charge) is expressed in Amp Hours (Ah) rather than multiplying it by the voltage.
12V Consumption Calculation
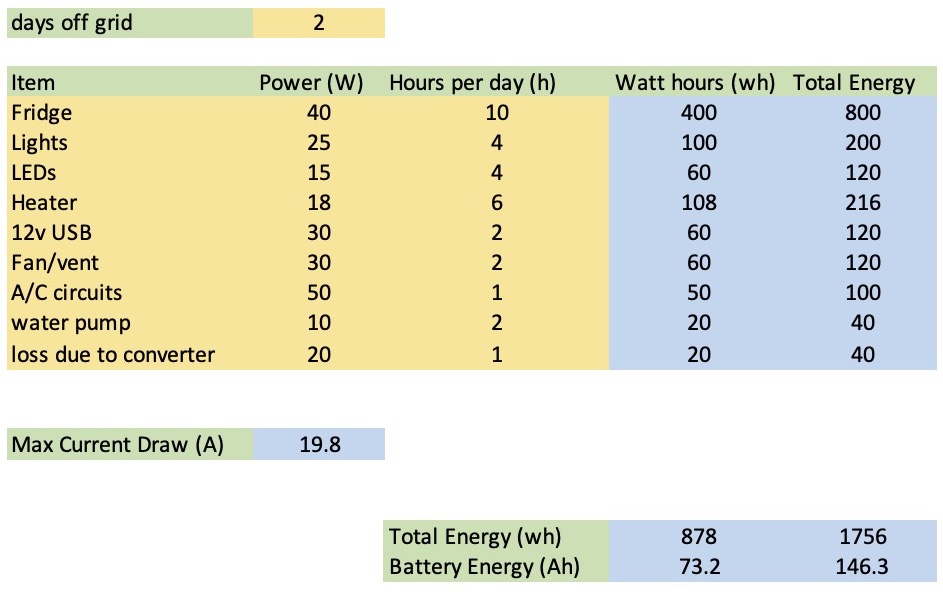
I created a spreadsheet to calculate the power requirements in the camper van.
This will help size the battery system and the solar panel requirements.
You can get the power rating of the different components from the manufacture’s websites or datasheets (if they give current consumption then use equation 2, P=VI).
I estimated how long per day they would be used at full power and multiplied the hours per day by the power to get Watt hours or energy used per day. This was then multipled by the requirement to be "off grid" for 2 days to get total energy.
The final step is to divide this number by the voltage (12V) to get the battery energy in amp hours (Ah). In my example I need about 146 Ah of battery energy to last a weekend in a van without running out of power.
This is fairly simplistic and doesn't consider how different battery chemistries should be used in practice and the fact that voltage varies over the discharge of the battery but is a good estimate to start sizing battery capacity.
Wiring Sizing
While I was in the Design phase of the project I created a full wiring diagram for all the devices that I was going to install in the vehicle. This not only helped me on working out the power requirement but also allowed me to work out where all the wires needed to be placed when I came to build the vehicle. Wiring goes in at the beginning of the build and is difficult to add in latter in the build. I also could size the wires for current draw and length of cable run.
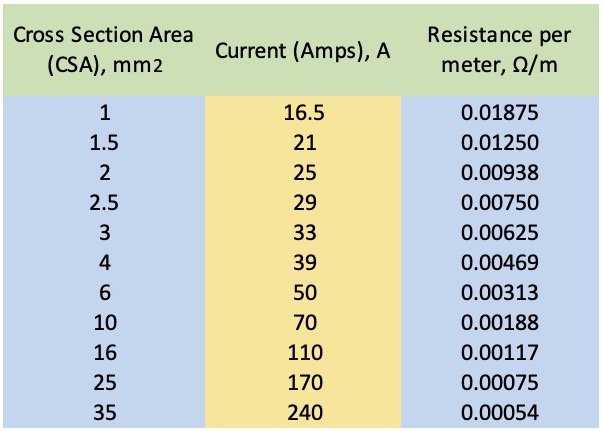
Cables can handle different electrical currents (Amps) depending upon the cross-sectional area of the wire. Think of it as a water pipe, a hose pipe (13mm dia) delivers water slowly to a bucket but this comes off a mains pipe (250mm dia) that delivers water to your whole street. With wire the larger the diameter the greater the cross-sectional area and so the greater the current it can carry.
The cable also has a resistance which will cause losses in power transfer. This is normally shown as a voltage drop per meter of wire. So, the longer the wire the greater the voltage drop. The resistance is related to the diameter of the wire.
So, the current capacity and voltage drop of a wire depends on the cross-sectional area of the wire.
Charts can tell you these values but ensure you don't use the maximum value as we need to allow some overhead and it is a balance for current capacity and voltage drop. (These values are for the cable I used, always check the values for the cable you use.)
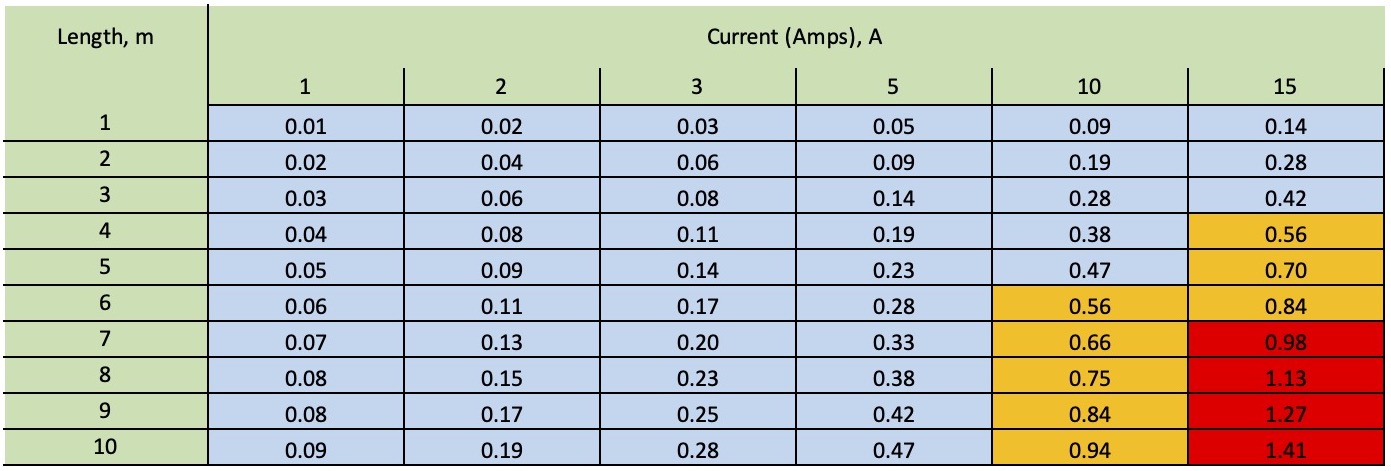
Below shows the voltage drop for 2mm sq. wire at different currents and for different lengths. You want to keep the voltage drop below about 0.48V so stay out of the orange area.
Voltage drop = Resistance/meter x Length x Current in wire
So, you cannot put more than 10A through this cable at 5 m length before you go over 0.48V drop. Note that the capacity of the cable is 25A!
REMEMBER that the length is the total cable length including the return negative (Red and Black wires). This means the distance to the device is only 2.5 m!
Safety
There are certain regulations (legal requirements) that must be followed when converting a van to a camper van (DVLA also require certain things). There are also some caravan & Motorhome standards and trade practices, although are not legal requirements, it does make good sense to follow them as required.
Make sure you do your research and if in any doubt ask a professional. 240v AC and gas will be outside the range of many basic DIY enthusiasts and they can KILL - Be Safe and follow advice.
Personal safety seems obvious but I’ve seen enough in my working life and on YouTube to realise many people either don’t understand or choose to ignore basic safety.
